Webflow
Publish articles straight to a live Webflow CMS collection: the four-step wizard, the field-mapping screen, and what does and does not travel.
Updated Aug 26, 2026 · 8 min read
Webflow publishing is live, on every plan, and it has been for a while.
If you read an older version of this page that said otherwise and went off to paste articles in by hand, that is on us. Here is the real thing: a four-step wizard, one field-mapping screen, and items that land on your live site without a site republish.
What it does
Connect once, and hitting Publish on an article creates a live item in one Webflow CMS collection with your content already in the right fields.
RankSpiral posts to Webflow's live items endpoint. That means the item is published to the production site directly, rather than sitting as a staged change waiting for you to press Publish in the Webflow designer.
There is no draft state. An article you publish from RankSpiral is on your live blog moments later. Your gate is the In Review stage in RankSpiral, not anything on the Webflow side.
One project connects to one collection. Choose the collection your posts actually live in.
Before you start
You need two things ready: an API token from your Webflow account, and a CMS collection with the right field types in it.
The collection matters more than people expect. RankSpiral maps by field type, so the types have to be correct before you connect:
- Plain text for the title - Webflow's default Name field usually does the job.
- Rich text for the body - required, and non-negotiable. Plain text will flatten every heading, link, and list into one grey block.
- Slug - Webflow gives every collection one automatically.
- Two plain text fields for meta title and meta description - optional, but RankSpiral only offers plain text fields here, so a rich text "SEO description" will not appear in the dropdown.
How to connect
Step 1: paste the API token
Open Integrations in your project and find the Webflow card. The step counter above the form tracks where you are.
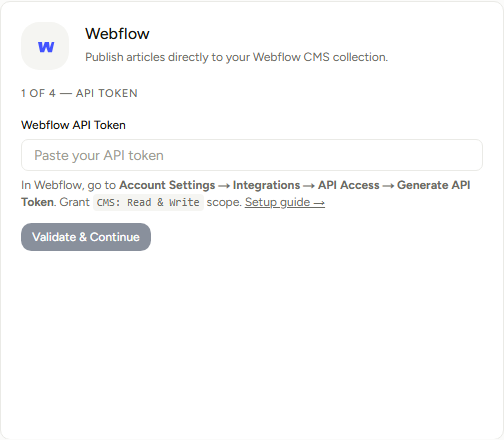
In Webflow, go to Account Settings → Integrations → API Access → Generate API Token and grant it CMS: Read & Write. Read-only tokens pass validation here and then fail at the moment you publish.
Paste it into Webflow API Token and click Validate & Continue. RankSpiral calls Webflow straight away, so a bad token comes back as Invalid API token. Check your Webflow site settings. rather than failing days later.
Step 2: select the site
A Webflow token can reach every site in your workspace, so Select Site lists all of them. Pick the one with the blog on it and click Next.
Step 3: select the collection
Select Collection lists the CMS collections on that site. For most people this is Blog Posts.
Choose it and click Next. RankSpiral reads the collection's field structure, which is what step 4 runs on.
Step 4: map the fields
This is the screen that decides whether anything works, and the only one worth slowing down for.
Webflow collections are yours, not ours, so RankSpiral has to be told which of your fields is the title and which is the body. Everything else on this screen is optional.
| Field | What lands in it | Offered from |
|---|---|---|
| Title Field | The article title | Plain text fields first, then other text fields |
| Body / Rich Text Field | The full article as HTML | Rich text fields only, when the collection has any |
| Slug Field | The URL slug set on the article | Slug fields |
| Meta Title | The SEO title, when the article has one | Plain text fields |
| Meta Description | The SEO description, when the article has one | Plain text fields |
RankSpiral pre-selects sensible answers by reading your field names and slugs. It looks for name or title on a plain text field, body, content, post-body, or rich on a rich text field, and the usual meta-title and meta-description variants for the SEO pair.
Standard Webflow blog collections map themselves. Heavily customised ones need a look.
Only editable fields appear. Webflow marks some fields as system-managed, and those are filtered out before you see the list. If a field you expected is missing, that is usually why. The other reason is type: the Meta dropdowns only ever show plain text fields.
Connect Webflow stays disabled until Title and Body are both set. Once saved, the card shows your site address and collection name behind a Connected chip.
What actually gets published
Publishing sends a live item to your collection with the fields you mapped:
- The body arrives as HTML. Headings, links, lists, and inline images are preserved. The article's own H1 is removed first, because your Webflow template already renders the title.
- FAQ schema is appended when the article has a FAQ section and the project setting is on.
- Empty optional fields are skipped. Mapping a Meta Description field and then publishing an article without one leaves that field untouched rather than blanking it.
And what does not travel:
No image field, no categories, no tags, no author reference. RankSpiral writes text into the five fields on the mapping screen and nothing beyond them.
The hero image is stripped from the top of the body during publishing, and there is no image field in the mapping, so it does not reach Webflow at all. Give your collection template its own image treatment, or set the main image per item in the Webflow editor.
The success link points at the .webflow.io address. RankSpiral builds the confirmation link from the site name Webflow reports, which is the staging domain even when your site runs on a custom one. The item itself is on the live site either way. The link in the toast is just cosmetically wrong.
Publishing to more than one place
One Publish click sends the article to every CMS connected on that project.
Useful when that is deliberate. Less useful when a WordPress connection you set up to test six weeks ago is quietly duplicating everything. Disconnect the ones you are not using.
Retrolink's CMS sync, which pushes newly added internal links back out to already-published posts, does not cover Webflow. Links added retroactively will show in RankSpiral and not on the Webflow item.
Getting the most out of it
Clone your blog collection and publish into the clone first. Webflow makes duplicating a collection trivial, and one test article into a copy tells you within two minutes whether the body field is right. Doing this on the live collection instead means deleting a live post, which is a worse Tuesday.
Check the rich text styling in the Webflow designer before you scale up. Webflow only styles rich text elements you have explicitly styled, so unstyled H3s and lists render as browser defaults. Publish one article, open the collection page in the designer, and style every nested element once. It applies to every article you publish afterwards.
Map the slug field even though Webflow will invent one. RankSpiral picks short, keyword-first slugs. Webflow's auto-generated version is the full title, dashes and all, and it is permanent once indexed.
Fill in required fields Webflow needs and RankSpiral does not know about. If your collection has a required Category reference or a required image, the publish fails with a Webflow error naming that field. Either make it optional, or give it a default in the collection settings.
Re-run the wizard after you change the collection. Adding fields in Webflow does not update the saved mapping. Edit Connection walks the four steps again and re-reads your structure from scratch, which takes about a minute.
It is set up correctly when the first published article appears on your live blog with headings, links, and lists rendering the way your styled template intends, at the slug RankSpiral chose. Get that right on article one and article fifty needs no attention at all.
Troubleshooting
- "Invalid API token. Check your Webflow site settings." The token is wrong, revoked, or missing the CMS scope. Generate a fresh one with CMS: Read & Write.
- The collection dropdown is empty. That site has no CMS collections. Check you picked the right site in step 2.
- The Body dropdown offers nothing sensible. Your collection has no rich text field, so RankSpiral falls back to listing everything. Add a rich text field in Webflow and reconnect rather than mapping the body to plain text.
- "Webflow field mapping incomplete. Edit the integration to reconfigure." The saved mapping lost its title or body entry. Click Edit Connection and redo the four steps.
- "Webflow returned 400" followed by a message. Webflow rejected the item and told you why in that message. Read it: the usual culprits are a duplicate slug, a required collection field RankSpiral was not asked to fill, or a value that does not match the field's type.
- Published, but the article looks unstyled. That is Webflow's rich text styling, not the content. Style the nested elements on your collection page template once and every article inherits it.
The four steps take about three minutes, and step four is the only one that can be wrong.
Publish one article into a duplicate collection before you point this at the blog people actually read... it is the cheapest insurance in the product.
Was this page useful?
Tell us what was missing and we'll fix the page.