Connecting Your Site
Connect WordPress, Shopify, Webflow, Framer, a webhook, or Search Console, and the two settings that decide how hands-off publishing gets.
Updated Sep 9, 2026 · 8 min read
Articles that never leave the drafts folder are just expensive notes.
Connecting your CMS is the step that turns RankSpiral from a writing tool into a publishing one, and for every platform here it takes under five minutes. Most of that is spent in the other tab, generating a token.
This page covers all six connections, what each one actually needs from you, and the two settings that decide whether publishing is one click or zero.
What you can connect today
Everything below lives in one place: Integrations in the sidebar, under Connect.
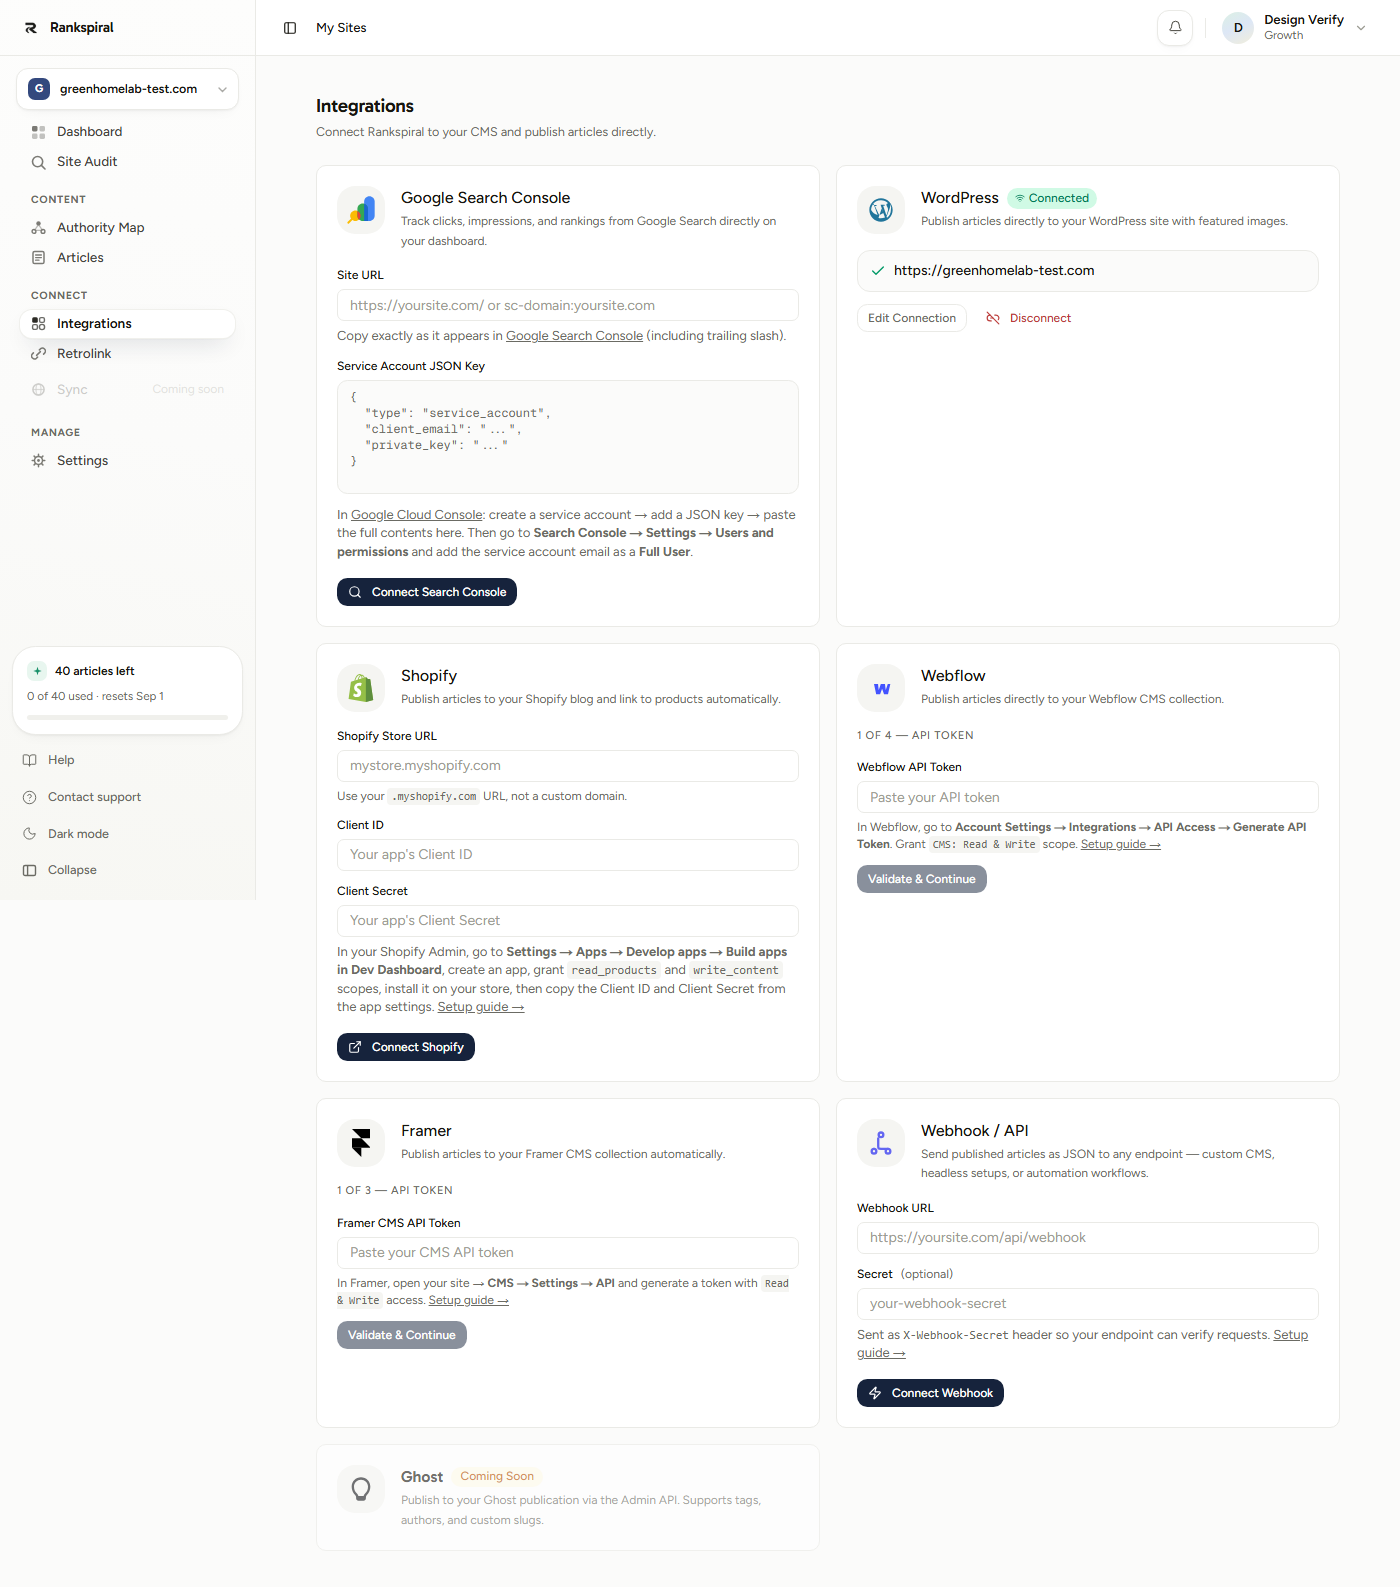
| Platform | What it needs | Setup shape |
|---|---|---|
| WordPress | Site URL, username, application password | One form |
| Shopify | Store URL, Client ID, Client Secret | One form, then a product sync |
| Webflow | API token, then site, collection, field mapping | Four steps |
| Framer | CMS API token, then collection, field mapping | Three steps |
| Webhook / API | An endpoint URL, optionally a secret | One form (Growth and up) |
| Google Search Console | Site URL, service account JSON key | One form |
Ghost appears on the page with a Coming Soon badge and does not publish yet. If you are on Ghost, use the webhook.
CMS publishing is on every plan, including the trial. The generic Webhook / API card is the one exception: it shows a Growth+ pill on Starter.
WordPress
The most common connection, and the fussiest part is not in RankSpiral at all. WordPress needs an application password, which is a separate credential from the one you log in with.
Make it first:
- In WordPress admin, go to Users → Your Profile.
- Scroll to Application Passwords, type a name like RankSpiral, and click Add New Application Password.
- Copy the generated value. WordPress shows it exactly once, spaces and all, and the spaces are part of it.
Then in RankSpiral, on the WordPress card, fill in WordPress Site URL, Username, and Application Password, and click Connect WordPress.
RankSpiral immediately calls your site's REST API to prove the credentials work rather than trusting them. When it succeeds, the card title grows a green Connected pill, your site URL appears below it with a check mark, and the buttons become Edit Connection and Disconnect.
The two failures people hit. "Invalid username or application password" means you pasted your login password instead of the application one, or stripped the spaces out of it. "Could not reach" usually means a security plugin is blocking /wp-json/. Open yoursite.com/wp-json/wp/v2/users/me in a browser: if that 404s, the REST API is disabled, and no credential will fix it.
Shopify
Shopify wants a custom app you create yourself, which sounds heavier than it is.
- In Shopify Admin go to Settings → Apps → Develop apps → Build apps in Dev Dashboard and create an app.
- Grant it exactly two scopes:
read_productsandwrite_content. - Install it on your store, then copy the Client ID and Client Secret from the app settings.
- Paste both into RankSpiral along with your Shopify Store URL, and click Connect Shopify.
The store URL must be the .myshopify.com one, not your customer-facing domain. RankSpiral rejects a custom domain with a message telling you where to find the real one, which is Shopify Admin → Settings → Domains.
On first connect it syncs your catalogue automatically and the card starts showing a product and collection count. Access tokens are refreshed for you, so this is the last time you think about credentials.
Re-sync after any big catalogue change. The Sync Products button appears once you are connected, and running it is what lets articles link to the right product pages instead of the ones that existed last quarter.
Webflow and Framer
Both are live, both are wizards, and both end at the same place: telling RankSpiral which field in your CMS collection holds which part of an article.
Webflow runs four steps, labelled 1 of 4 API token through 4 of 4 Map fields. Get the token from Account Settings → Integrations → API Access → Generate API Token, and grant it CMS: Read and Write scope. Then pick your site, pick the collection (usually the one called Blog Posts), and map.
Framer runs three steps, because there is no site to pick. Generate the token in your Framer site under CMS → Settings → API with Read and Write access, choose the collection, and map.
The mapping screen is identical on both:
- Title Field and Body / Rich Text Field - required, and the connect button stays inert until both are set.
- Slug Field, Meta Title, Meta Description - optional, each with a None option.
Fill the optional three anyway. Skipping the meta fields means every article publishes with whatever your collection template invents, and that is the field search engines read first.
Map Body / Rich Text Field to an actual rich text field, not a plain text one. Plain text fields render the article's HTML as visible tags, and it looks exactly as bad as it sounds.
Webhook / API
For a headless setup, a custom CMS, or anything you would rather wire yourself.
Enter a Webhook URL, optionally a Secret, and click Connect Webhook. RankSpiral POSTs JSON to that endpoint every time an article publishes, with these keys:
event,canonicalUrl,title,slug,content,excerpt,metaTitle,metaDescription,featuredImage,featuredImageAlt,keyword,faq,publishedAt
content arrives as HTML, with FAQ structured data appended unless you turn that off in Settings → Publishing. If you set a secret, it is sent as an X-Webhook-Secret header so your endpoint can reject anything else.
Use Test Webhook before you trust it. It sends a payload with event set to test and a title of Test Article from RankSpiral, so you can build your handler against real shape rather than a guess.
One useful detail: if your endpoint replies with JSON containing a url or postUrl key, RankSpiral stores it and the article links to its live location afterwards. Two lines in your handler, and the round trip closes.
Google Search Console
Not a publishing target. This is the one that puts real clicks and impressions on your dashboard, next to the rank positions RankSpiral measures itself.
It uses a service account rather than an OAuth pop-up:
- In Google Cloud Console, create a service account and add a JSON key.
- Paste the entire file contents into Service Account JSON Key.
- In Search Console → Settings → Users and permissions, add the service account's email address as a Full User.
- Enter your Site URL and click Connect Search Console.
The Site URL must match Search Console character for character, including the trailing slash. A domain property looks like sc-domain:yoursite.com; a URL-prefix property looks like https://yoursite.com/. Getting this subtly wrong is the single most common reason the dashboard panel stays empty.
Getting the most out of it
Connect before you generate, not after. The order does not break anything, but a connected site turns publishing into one click from the article list, and an unconnected one turns it into a copy-paste job you will do forty times.
Decide about Auto-Publish deliberately. It lives in Settings → General, it is off by default, and switching it on means generated articles go straight to your CMS with nobody reading them first. Here is the sequencing that works: leave it off for your first five articles, read every one, fix your voice description based on what you find, then turn it on and stop thinking about it.
Import your pages the same day you connect. In Settings → Offerings, the Your Pages section takes either a Sitemap URL or a Crawl Homepage URL and pulls in up to 500 pages. Those pages are what internal links point at, so an article written before the import links to a thinner site than an article written after it. This is the highest-value two minutes on the page.
Turn on Notify Google after publish once Search Console is connected. Also in Settings → Publishing, off by default, and it resubmits your sitemap on every publish. It is a nudge rather than a guarantee, but discovery going from days to hours is worth one toggle.
Test with an article you would be happy to delete. Publish one real piece, look at it on your live site, and check three things: images loaded, internal links resolve, and the meta title is yours rather than your theme's default. Fix the mapping now, not after twenty.
You are done when the card shows a green Connected pill, one article is live on your own domain, and it looks like the rest of your site rather than a pasted document.
Troubleshooting
- Publish does nothing and no error appears. Check the article's status first. Only a finished article can publish, and one still mid-pipeline will sit there quietly.
- Articles publish but images are missing. On WordPress this is usually a media-upload permission on the user whose application password you used. On Webflow and Framer, confirm the token carries write access, not read.
- Formatting looks wrong on Webflow or Framer. The body field is mapped to plain text. Remap it to rich text and republish.
- Search Console connected but the dashboard panel is empty. Either the Site URL does not match the property exactly, or the service account was added with a lower permission than Full User. It is nearly always the first one.
- Shopify says invalid credentials after it worked before. The custom app was uninstalled or its scopes were edited. Reinstall, then use Edit Connection with the current Client ID and Secret.
Connecting a CMS is the least interesting fifteen minutes in this product, and the one that changes what all the other fifteen-minute jobs are worth.
Was this page useful?
Tell us what was missing and we'll fix the page.